In this tutorial, we will be deploying OAuth2 Proxy to a kubernetes cluster using Azure Active Directory as the authentication provider and Traefik as the reverse proxy.
We will also be using FluxCD with Kustomize to deploy Kubernetes resources via Helm.
Requirements:
- Azure AD tenant
- domain name
- git repository configured with flux
- kubernetes cluster
- kubectl tool installed your computer
- tls certificates configured on your cluster
You can also deploy the helm releases we will be using manually by running kubectl apply -f helmrelease.yaml if you don’t want to set up Flux. You can also avoid having to use TLS certificates if you’re just testing this out locally but the guide will assume you are using all of the above.
What is Oauth2 Proxy?
If you have an application you want to make available on the internet but you want to grant access only to authorised users, you can use OAuth2 Proxy to force visitors to authenticate with an authentication provider like Google or Microsoft.
The tool is mainly focused on using NGINX reverse proxy so much of the official documentation is around that technology. This guide will give you guidance on how to use OAuth2 Proxy with Traefik reverse proxy which requires some specific setup to work.
Setup for Azure AD
The official docs have clear guidance on setting up an application registration in Azure Active Directory. Follow their guide for this step and come back here once you’ve completed that.
Note: This guide refers to Azure AD which has been renamed to Entra ID. As such, there may be values in this guide which are out of date but the general guidance is still valid. Please refer to the official docs for the latest flags accepted by the provider.
For this we will be using the v1 endpoint but I have also enabled the v2 endpoint in the application manifest as per point 4 in the linked guide.
Deploying OAuth2 Proxy to Kubernetes using Flux and Helm
There is an official helm chart provided by the developers of OAuth2 Proxy.
The source code for this can be found on GitHub.
The following kubernetes manifests will get you up and running but there are slight improvements to be made to these configs which we will explore later on in the guide e.g. using kubernetes secrets.
Deploying the helm repository
In your git repository, add the helm repository to install the chart on the cluster:
View code
apiVersion: source.toolkit.fluxcd.io/v1beta2
kind: HelmRepository
metadata:
  name: oauth2-proxy-charts
  namespace: default
spec:
  interval: 1h
  url: https://oauth2-proxy.github.io/manifests
  timeout: 3m
Deploying the helm release
Create a helm release and replace the example values like domain.com with your own values.
View code
apiVersion: helm.toolkit.fluxcd.io/v2beta1
kind: HelmRelease
metadata:
  name: oauth2-proxy
  namespace: default
spec:
  releaseName: oauth2-proxy
  chart:
    spec:
      chart: oauth2-proxy
      version: 6.12.0
      sourceRef:
	kind: HelmRepository
	name: oauth2-proxy-charts
	namespace: default
  interval: 5m
  values:
    extraArgs:
      cookie-domain: ".domain.com, .domain.net"
      email-domain: "domain.com"
      pass-authorization-header: true
      pass-basic-auth: false
      pass-host-header: true
      pass-user-headers: true
      provider: "azure"
      redirect-url: https://oauth2-proxy-01.domain.com/oauth2/callback
      reverse-proxy: true
      set-authorization-header: true
      set-xauthrequest: true
      show-debug-on-error: true
      skip-provider-button: true
      silence-ping-logging: true
      upstream: static://202
      whitelist-domain: ".domain.com"
      client-id: "<CLIENT-ID>"
      client-secret: "<CLIENT-SECRET>"
      cookie-secret: <COOKIE-SECRET>"
      oidc-issuer-url: "https://sts.windows.net/<TENANT-ID>/"
      extra-jwt-issuers: "https://login.microsoftonline.com/<TENANT-ID>/v2.0=<CLIENT-ID>"
      azure-tenant: "<TENANT-ID>"
    redis:
      enabled: false
    ingress:
      annotations:
	traefik.ingress.kubernetes.io/router.tls: "true"
      className: traefik
      enabled: true
      hosts:
	- oauth2-proxy-01.domain.com
Configuration options
You can find explanations for what these options mean in the OAuth2 Proxy docs but I want to give you some pointers on why these particular arguments are useful / required.
| Argument | Example value | Why is it needed? |
|---|---|---|
| azure-tenant | “abcd1234-5678-91ef-23gh-ij4kl5mn6o” | Your Azure AD tenant id |
| client-id | “abcd1234-5678-91ef-23gh-ij4kl5mn6o” | The client id of the app registration you will have created in Azure AD |
| client-secret | “abcdefghijklmnopqrstuvwxyz1234456789?~!@$%” | The client secret you will have generated for the app registration in Azure AD |
| cookie-domain | “.domain.com, .domain.net” | Used to cache cookies for the correct domain. It can be set to “*” to allow all domains |
| cookie-secret | “wj7fY0MwSPKZZoxUaUNnoeqgN0lEr5f-F6vGIFO1AR4=” | A randomly generated secret from the command line on your computer. See here |
| email-domain | “domain.com” | Can be used to restrict sign in to only certain domains. Use “*” to allow all domains |
| extra-jwt-issuers | “https://login.microsoftonline.com/YOUR-TENANT-ID/v2.0=YOUR-CLIENT-ID” | A list of extra JSON Web Token (JWT) issuer URLs. This is needed as there are two endpoints that Azure AD offers for authentication |
| oidc-issuer-url | “https://sts.windows.net/YOUR-TENANT-ID/” | The OpenID Connect issuer URL for your provider, in this case, Azure AD |
| pass-authorization-header | true | Pass OIDC IDToken to upstream via Authorization Bearer header |
| pass-basic-auth | false | Pass HTTP Basic Auth, X-Forwarded-User, X-Forwarded-Email and X-Forwarded-Preferred-Username information to upstream. Set to false for Azure AD. |
| pass-host-header | true | Pass the request Host Header to upstream |
| pass-user-headers | true | Pass X-Forwarded-User, X-Forwarded-Groups, X-Forwarded-Email and X-Forwarded-Preferred-Username information to upstream |
| provider | “azure” | The authentication provider you want to use e.g. google for Google or azure for Azure AD |
| redirect-url | https://oauth2-proxy-01.domain.com/oauth2/callback | The redirect URL for OAuth2 Proxy. Tells your request where to go once authenticated. You will have to enter this in the Redirect URIs section of your app registration in Azure AD |
| reverse-proxy | true | Tells OAuth2 Proxy that it’s running behind a reverse proxy i.e. Traefik |
| set-authorization-header | true | Set Authorization Bearer response header (useful in Nginx auth_request mode) |
| set-xauthrequest | true | Set X-Auth-Request-User, X-Auth-Request-Groups, X-Auth-Request-Email and X-Auth-Request-Preferred-Username response headers (useful in Nginx auth_request mode). When used with –pass-access-token, X-Auth-Request-Access-Token is added to response headers. |
| show-debug-on-error | true | Show more informative error messages in the kubernetes pod logs |
| silence-ping-logging | true | Hides ping messages in the log. These aren’t very useful and clutter the log |
| skip-provider-button | true | There is an option to show an interstitial page giving you the option to choose your authentication provider. Useful if you are using multiple authentication methods |
| upstream | static://202 | The upstream page to show when you’ve connected and authenticated directly to the OAuth2 Proxy. You could set this to an application URL if you want to redirect to a default application but this static page is enough to tell you the OAuth2 Proxy is working. When you authenticate, it will show a simple page saying Authenticated |
| whitelist-domain | “.domain.com” | Domain names you want to allow redirection to. Similar to email domains but for the destination application rather than the user |
Redis can be deployed in instances where the cookies are too large and cause issues with authenticating to your application. This can be the case in some applications that support Single Sign On (SSO). Our ideal setup will have redis enabled and we will come back to this later.
Deploying the ingress
The chart contains an ingress controller template as per the example above. You will need to create an ingressClass by deploying Traefik using their official helm chart. The ingressClass will be named after your traefik helm release. If you use the file below, your ingressClass will be called traefik. Replace X.X.X.X with an appropriate IP address.
View code
apiVersion: helm.toolkit.fluxcd.io/v2beta1
kind: HelmRelease
metadata:
  name: traefik
  namespace: default
spec:
  values:
    ingressRoute:
      dashboard:
        enabled: false
    globalArguments:
      - --global.sendanonymoususage=false
    ingressClass:
      enabled: true
      isDefaultClass: true
    logs:
      general:
        level: DEBUG
      access:
        enabled: true
    ports:
      traefik:
        expose: true
      web:
        redirectTo: websecure
    service:
      spec:
        loadBalancerIP: "X.X.X.X"
  chart:
    spec:
      chart: traefik
      version: 23.0.1
      sourceRef:
        kind: HelmRepository
        name: traefik-charts
        namespace: default
  interval: 5m
The annotation traefik.ingress.kubernetes.io/router.tls: "true" will tell Traefik to use https instead of http with a TLS certificate. You will need to configure a TLS certificate on your cluster to avoid certificate error messages in your browser from using the certificate that comes with Traefik which won’t be trusted.
This is coupled with web: redirectTo: websecure which will redirect http requests to https.
There are many ways to deploy and use certificates with Traefik that will depend on your setup so we won’t go into that in depth here. If you’ve never set something like this up before, the cert-manager docs are a good resource to get started with.
If you’re just testing this all out locally, you can set traefik.ingress.kubernetes.io/router.tls to false or not set it at all and remove the redirect so it only uses http, however, I have not tested this approach specifically for this guide and you may run into issues with the Azure AD application registration as it requires https redirect URIs unless you can use http://localhost.
Deploying the middlewares
Create the required middlewares:
View code
apiVersion: traefik.containo.us/v1alpha1
kind: Middleware
metadata:
  name: oauth-auth
  namespace: default
spec:
  forwardAuth:
    address: http://oauth2-proxy.default/oauth2/auth_or_start
    trustForwardHeader: true
    authResponseHeaders:
      - X-Auth-Request-Access-Token
      - Authorization
      - X-Auth-Request-User
      - X-Auth-Request-Email
      - X-Auth-Email
      - X-Auth-Username
---
apiVersion: traefik.containo.us/v1alpha1
kind: Middleware
metadata:
  name: oauth-headers
  namespace: default
spec:
  headers:
    sslRedirect: true
    stsSeconds: 315360000
    browserXssFilter: true
    contentTypeNosniff: true
    forceSTSHeader: true
    stsIncludeSubdomains: true
    stsPreload: true
    frameDeny: true
The middlewares are used to intercept the request and send it to the OAuth2 Proxy when it detects that you are not authenticated by means of a 401 Unauthorized http status code being returned.
The forwardAuth address can be set to a fully qualified domain name but it should be noted that DNS for that URL will be required. In the example above, we are using the cluster DNS name of the kubernetes service which will always work. If you use a FQDN and the DNS changes or is unreachable, the application won’t work.
The cluster DNS name for the service follows the format servicename.namespace
The official docs have an example that uses the /oauth2/auth endpoint in the address, however, I have found that this does not always work, so you should use the /oauth2/auth_or_start endpoint instead as per my example.
See also: https://github.com/oauth2-proxy/oauth2-proxy/issues/46
Checking progress
Once you commmitted these files to your repo and flux has synced the changes with your cluster, you should see the helm release successfully deployed by running kubectl get helmrelease:
NAME           AGE   READY   STATUS
oauth2-proxy   4d    True    Release reconciliation succeeded
You can run kubectl get pods to view the running pods:
NAME                            READY   STATUS    RESTARTS   AGE
oauth2-proxy-59cb698789-mtmwq   1/1     Running   0          12h
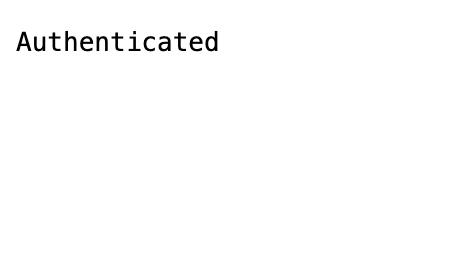
If you’ve configured your DNS, you should be able to connect to OAuth2 Proxy in a web browser. Since we’ve configured the upstream as static://202, we’re greeted with a white page with the word Authenticated in the top left corner.
Deploying an application behind OAuth2 Proxy
To see OAuth2 Proxy providing authentication to another application, we first need to deploy one with an ingress using Traefik.
Any application should do but, for this example, we will use a simple hello world style application called Hello Kubernetes.
Similar to what we’ve done with Traefik and OAuth2 Proxy, we need a helm release and an ingress. In this case, we will need a git repository manifest instead of a helm repository.
First, we’ll deploy the application without placing it behind OAuth2 Proxy to make sure it’s reachable.
Deploying the git repository
View code
apiVersion: source.toolkit.fluxcd.io/v1beta2
kind: GitRepository
metadata:
  name: hello-kubernetes-charts
  namespace: default
spec:
  interval: 5m0s
  url: https://github.com/paulbouwer/hello-kubernetes
  ref:
    branch: main
  ignore: |
    # exclude all
    /*
    # include deploy dir
    !/deploy/helm
Deploying the helm release
View code
apiVersion: helm.toolkit.fluxcd.io/v2beta1
kind: HelmRelease
metadata:
  name: hello-kubernetes
  namespace: default
spec:
  releaseName: hello-kubernetes
  chart:
    spec:
      chart: deploy/helm/hello-kubernetes
      version: 1.0.0
      sourceRef:
        kind: GitRepository
        name: hello-kubernetes-charts
        namespace: default
  interval: 5m
  values:
    service:
      type: ClusterIP
Deploying the ingress
View code
kind: Ingress
metadata:
  name: hello-kubernetes
  namespace: default
  annotations:
    traefik.ingress.kubernetes.io/router.tls: "true"
spec:
  ingressClassName: traefik
  rules:
    - host: hello-kubernetes.domain.com
      http:
        paths:
          - path: /
            pathType: Prefix
            backend:
              service:
                name:  hello-kubernetes-hello-kubernetes
                port:
                  number: 80
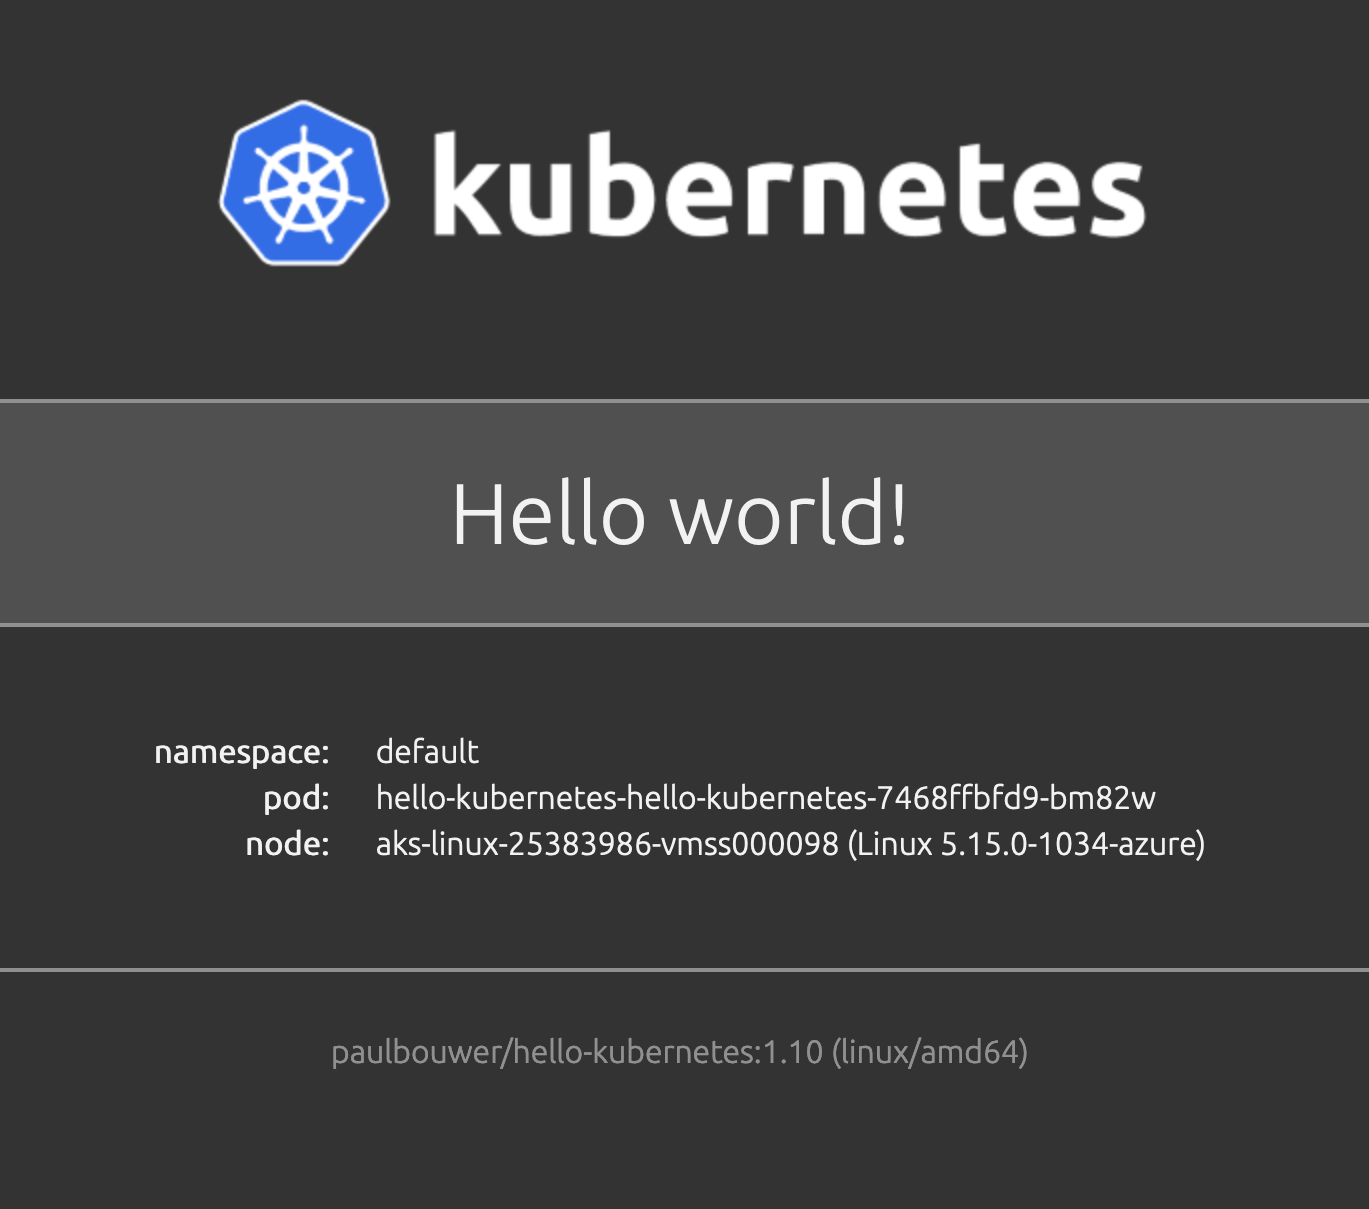
These manifests should deploy the Hello Kubernetes application and if you open the URL (the host line in your ingress from above) in your web browser, you should see something like this:
In order to force visitors to authenticate, we need to tell Traefik to send unauthenticated requests to OAuth2 Proxy. This is where our middlewares now come into play.
In our ingress, we need to add an annotation that will send all requests via the OAuth2 Proxy.
The annotation needs to use the full kubernetes name of the middleware which follows the format namespace-middlewarename@kubernetescrd. Our middlewares are called oauth-auth and oauth-headers so their full names are default-oauth-auth@kubernetescrd and default-oauth-headers@kubernetescrd.
That gives us an ingress manifest looking like this:
View code
kind: Ingress
metadata:
  name: hello-kubernetes
  namespace: default
  annotations:
    traefik.ingress.kubernetes.io/router.tls: "true"
    traefik.ingress.kubernetes.io/router.middlewares: default-oauth-headers@kubernetescrd,default-oauth-auth@kubernetescrd
spec:
  ingressClassName: traefik
  rules:
    - host: hello-kubernetes.domain.com
      http:
        paths:
          - path: /
            pathType: Prefix
            backend:
              service:
                name:  hello-kubernetes-hello-kubernetes
                port:
                  number: 80
Go back to your application registration in Azure AD and add a new redirect URI and set the value to https://hello-kubernetes.domain.com/oauth2/callback. If you don’t do this, you will receive an error message at the Microsoft sign in page after signing in because it isn’t allowed to redirect you to the application. Think of the redirect URIs as an allow-list of applications that the app registration is allowed to redirect to.
Once this is deployed, open the Hello Kubernetes application in a private browsing window so there are no cached cookies.
You should be redirected to a Microsoft sign in page.
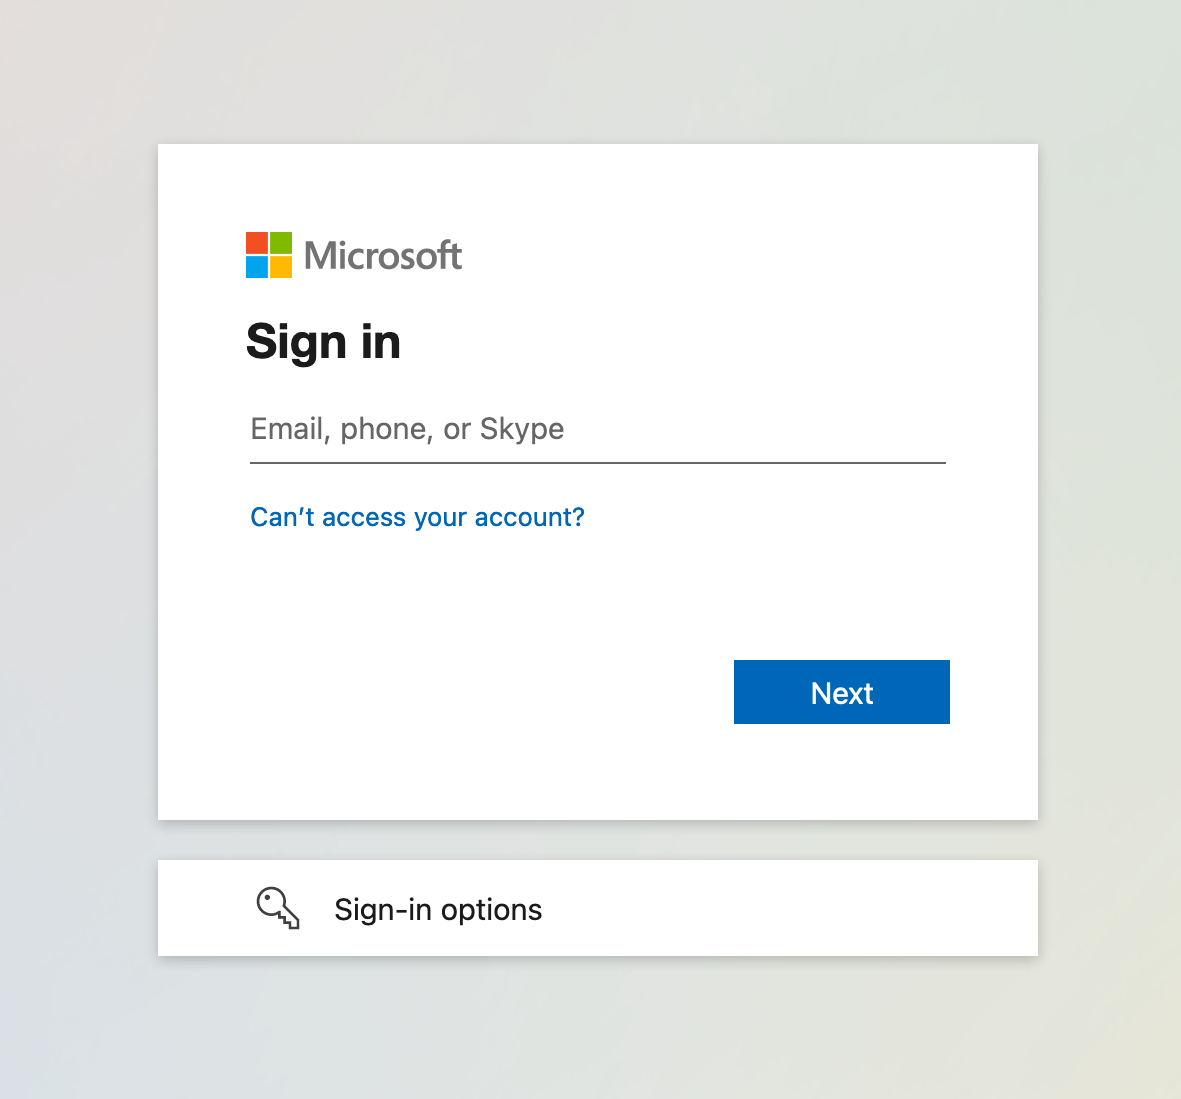
Sign in and then you’ll be redirected to the Hello Kubernetes application.
Ideal setup
Using kubernetes secrets
Now we’ve deployed our application behind OAuth2 Proxy, it’s time to make some tweaks. Traefik and Hello Kubernetes are fine as is but we can improve on OAuth2-Proxy.
The main thing we can do is to convert our arguments into secrets which can then be mounted in our pod. This is better for security and it means we can safely commit our secrets to code without worrying about them being visible in plain text so we don’t need a third party secret store like Azure Key Vault, but you can use that if you wish.
We won’t go into how to use Azure Key Vault to store our secrets and access them on the cluster here. You can find information on how to do that in the Microsoft docs. We will focus on encrypting our secrets so we can store them in source control instead.
To accomplish this, we can use a tool from Mozilla called SOPS. You can follow this guide to get set up with SOPS on your cluster.
Once you’ve got SOPS set up on your cluster, create a kubernetes secret in a local branch of your git repo (don’t commit this to GitHub):
View code
apiVersion: v1
kind: Secret
metadata:
    name: oauth2-proxy-values
    namespace: default
type: Opaque
stringData:
    azure-tenant: abcd1234
    client-id: abcd1234
    client-secret: abcd1234
    cookie-secret: abcd1234
    extra-jwt-issuers: abcd1234
    oidc-issuer-url: abcd1234
You can save this file in your oauth2-proxy app folder and then use the sops cli command to encrypt it. Depending on whether you use age or a cloud secret store like Azure Key Vault, the command will vary slightly.
With age:
sops --encrypt --age <my-age-public-key> --encrypted-regex "^(data|stringData)$" --in-place /path/to/file/oauth2-proxy-values.enc.yaml
With Azure Key Vault:
sops --encrypt --azure-kv https://my-key-vault-name.vault.azure.net/keys/sops-key/abcdefghi123456789 --encrypted-regex "^(data|stringData)$" --in-place /path/to/file/oauth2-proxy-values.enc.yaml
You can then safely commit the encrypted secret to GitHub because it can only be decrypted using the private key which will only be stored on your cluster, as well as locally on your computer (as with age) or in your cloud secret store (as with Azure Key Vault).
You can then use volumes, volumeMounts and environment variables to pass your secrets to the OAuth2 Proxy pods.
In the helm release below, we have set proxyVarsAsSecrets to true and added extraEnv, extraVolumes, extraVolumeMounts and valuesFrom attributes.
The environment variables are largely the same as the arguments they replace but in upper case and with underscores instead of hyphens.
More information on this can be found in the OAuth2 Proxy docs
You could replace all of the extraArgs section with secrets if you wanted to but none of those remaining are sensitive values so there’s not much to be gained in doing so and it could make it harder for people looking at your code to understand what’s going on and see what arguments are set to what values when troubleshooting.
View code
apiVersion: helm.toolkit.fluxcd.io/v2beta1
kind: HelmRelease
metadata:
  name: oauth2-proxy
  namespace: default
  annotations:
    flux.weave.works/automated: "false"
spec:
  releaseName: oauth2-proxy
  chart:
    spec:
      chart: oauth2-proxy
      version: 6.12.0
      sourceRef:
        kind: HelmRepository
        name: oauth2-proxy-charts
        namespace: default
  interval: 5m
  values:
    extraArgs:
      cookie-domain: ".domain.com"
      email-domain: "*"
      pass-authorization-header: true
      pass-basic-auth: false
      pass-host-header: true
      pass-user-headers: true
      provider: "azure"
      redirect-url: https://oauth-proxy-azure.domain.com/oauth2/callback
      reverse-proxy: true
      set-authorization-header: true
      set-xauthrequest: true
      show-debug-on-error: true
      skip-auth-route: /api
      skip-provider-button: true
      upstream: static://202
      whitelist-domain: ".domain.com"
    redis:
      enabled: false
    extraEnv:
      - name: OAUTH2_PROXY_AZURE_TENANT
        valueFrom:
          secretKeyRef:
            name: oauth2-proxy-values
            key: azure-tenant
      - name: OAUTH2_PROXY_CLIENT_ID
        valueFrom:
          secretKeyRef:
            name: oauth2-proxy-values
            key: client-id
      - name: OAUTH2_PROXY_CLIENT_SECRET
        valueFrom:
          secretKeyRef:
            name: oauth2-proxy-values
            key: client-secret
      - name: OAUTH2_PROXY_COOKIE_SECRET
        valueFrom:
          secretKeyRef:
            name: oauth2-proxy-values
            key: cookie-secret
      - name: OAUTH2_PROXY_EXTRA_JWT_ISSUERS
        valueFrom:
          secretKeyRef:
            name: oauth2-proxy-values
            key: extra-jwt-issuers
      - name: OAUTH2_PROXY_OIDC_ISSUER_URL
        valueFrom:
          secretKeyRef:
            name: oauth2-proxy-values
            key: oidc-issuer-url
    extraVolumes:
      - name: oauth2-proxy-values
        secret:
          secretName: oauth2-proxy-values
    extraVolumeMounts:
      - mountPath: "/var/oauth2"
        name: oauth2-proxy-values
    ingress:
      annotations:
        traefik.ingress.kubernetes.io/router.tls: "true"
      className: traefik
      enabled: true
      hosts:
        - oauth-proxy-azure.domain.com
    proxyVarsAsSecrets: true
    valuesFrom:
      - name: "oauth2-proxy-values"
        kind: Secret
Extras
Redis cache
So far, we have used OAuth2 Proxy to require authentication to access an application that has no authentication mechanism of its own.
However, you can also use OAuth2 Proxy to perform single sign on (SSO) with applications that require authentication and support SSO because ideally you would not login to Azure AD or Google and then have to login again to your application with a local username and password.
Some applications will work with the setup above as is, but some may experience errors that prevent you from signing in with SSO.
In some cases, this can be because of the size of the cookies. By default, the cookie limit in OAuth2 Proxy is 4KB but some authentication providers, e.g. Azure AD, provide much larger cookies.
If you’re having issues using SSO with OAuth2 Proxy, you may see error messages in the pod logs telling you the cookie is too large and that it exceeds the 4KB limit.
To get around this issue, you can use the bundled redis cache chart to cache these larger cookies for OAuth2 Proxy to use.
To do this, simply add the required values to your helm release:
View code
    redis:
      enabled: true
      auth:
        enabled: true
        existingSecret: oauth2-proxy-values
        existingSecretPasswordKey: redis-password
      master:
        persistence:
          enabled: true
          existingClaim: oauth2-proxy-redis-master
      replica:
        persistence:
          enabled: true
          existingClaim: redis-data-oauth2-proxy-redis-replicas-0
        replicaCount: 1
    sessionStorage:
      type: redis
      redis:
        existingSecret: oauth2-proxy-values
        standalone:
          connectionUrl: redis://oauth2-proxy-redis-master:6379
The values that are available are inherited from the upstream chart and you can view them here.
In the example above, I am using an existing persistentVolume and persistentVolumeClaim that I have created separately but you can remove the existingClaim value to tell the chart to create its own persistentVolume and persistentVolumeClaim on the cluster. Be aware, however, that you may experience permissions errors if you have not allowed the cluster to provision storage.
In the example above, I am also using a secret and environment variable to store the password for redis as detailed in this section of this guide. You can just add another secret to the yaml file and another environment variable to the helmrelease:
View code
apiVersion: v1
kind: Secret
metadata:
    name: oauth2-proxy-values
    namespace: default
type: Opaque
stringData:
    azure-tenant: abcd1234
    client-id: abcd1234
    client-secret: abcd1234
    cookie-secret: abcd1234
    extra-jwt-issuers: abcd1234
    oidc-issuer-url: abcd1234
    redis-password: abcd1234
View code
extraEnv:
  - name: OAUTH2_PROXY_REDIS_PASSWORD
    valueFrom:
      secretKeyRef:
        name: oauth2-proxy-values
        key: redis-password
Summary
In this guide, we’ve explored how to deploy an application to a kubernetes cluster and how to integrate OAuth2 Proxy with Traefik to force visitors to authenticate to Azure AD before they are allowed access our application.
YAML files for the helm releases, ingresses and other kubernetes resources can be found in this GitHub repo. Feel free to fork it and get started deploying OAuth2 Proxy with Traefik on Kubernetes.
If you have any suggestions on how this guide could be improved or if you’ve spotted an error that needs fixing, let me know by raising a GitHub issue.